Creating custom labels requires precision and attention to detail, especially when it comes to label bleeds. Properly understanding and implementing label bleeds can mean the difference between a professional-looking label and one that looks poorly cut.
This guide will help you understand what label bleeds are, why they are important, and how to incorporate them into your label design process to ensure perfect prints every time.
Understanding Clear Space and Label Bleeds: Ensuring Perfect Prints Every Time
What Are Label Bleeds?
Definition and Importance of Label Bleeds
Label bleeds refer to the extra area around the edge of a label design that extends beyond the intended cut line. This extra space ensures that there are no white edges when the label is cut. The bleed area typically ranges from 1/8 inch (0.125 inches or 3.175 mm) to 1/4 inch (0.25 inches or 6.35 mm) beyond the final cut line.
Common Issues Without Proper Bleeds
Without proper bleeds, you may encounter several issues:
- White Edges: When the cutting process is slightly off, it can leave white edges around your labels, which can look unprofessional.
- Misalignment: Slight shifts during printing or cutting can lead to designs being cut off or not centered properly.
- Inconsistent Borders: Designs with borders can appear uneven if bleeds are not correctly accounted for.
The Science of Bleeds: How Much Extra Space is Needed?
Standard Bleed Measurements
The standard measurement for label bleeds is usually around 1/8 inch (0.125 inches or 3.175 mm). However, it's always best to check with your printer for their specific requirements, as some might prefer 1/4 inch (0.25 inches or 6.35 mm) for added safety.
How to Calculate Bleed Space
Calculating bleed space involves adding the bleed measurement to each side of your label. For example, if your label is 2 inches by 3 inches and requires a 1/8 inch bleed, your design dimensions should be 2.25 inches by 3.25 inches.
Example Calculations
Let’s say you are designing a label that is 4 inches by 5 inches:
- Without Bleed: 4 inches x 5 inches
- With 1/8 inch Bleed: Add 0.125 inches to each side.
- Width: 4 + 0.125 + 0.125 = 4.25 inches
- Height: 5 + 0.125 + 0.125 = 5.25 inches
- Total Dimensions with Bleed: 4.25 inches x 5.25 inches

Best Practices for Designing with Bleeds
Setting Up Your Design Software for Bleeds
When setting up your design software (like Adobe Illustrator or InDesign), ensure you set the bleed dimensions right from the start. Most professional design software allows you to input bleed dimensions in the document setup stage.
Steps for Adobe Illustrator:
1. Open Illustrator and create a new document.
2. In the new document dialog box, set your dimensions.
3. Enter the bleed values (e.g., 0.125 inches) in the bleed section.
4. Click OK to create your document with bleeds.
Ensuring Text and Design Elements Stay Safe
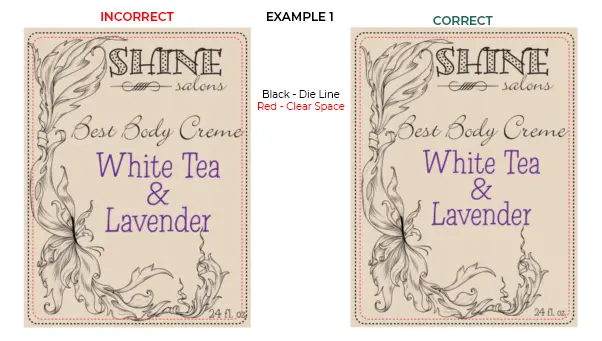
While the bleed area is essential for ensuring no white edges, it’s equally important to keep critical design elements and text within the “safe zone” (at least 1/8 inch inside the trim line). This ensures that nothing important gets cut off.
Using Guides and Margins Effectively
Use guides and margins in your design software to mark the safe zone and bleed areas clearly. This visual aid can help ensure that all critical elements are placed correctly within the design.
For more information on Label Bleeds, check out our blog post, Understanding Artwork Bleeds: Essential Tips for Perfect Labels.
Clear Space / Safe Area:
Protecting Important Design Elements
While label bleeds are critical for avoiding unwanted white edges, clear space, or the safe area, is equally essential in creating professional labels. Clear space refers to the buffer zone inside the label where no important design elements, like logos or text, should be placed.
This ensures that slight shifts during printing or cutting won’t result in these key elements being trimmed off. For example, if your finished label size is 3" x 1", your clear space area should be 2.875" x 0.875". Keeping your designs within this safe zone helps preserve the integrity of your labels.

The Die Cutting Process and Its Impact on Label Design

How Die Cutting Works
Die cutting is a process where a die (a specialized tool) is used to cut specific shapes out of a material. In label printing, die cutting allows for custom shapes and sizes of labels. The precision of die cutting makes it crucial to have proper bleeds to avoid any design issues.
Common Mistakes During Die Cutting
Common mistakes during die cutting include:
- Insufficient Bleed Area: Not allowing enough bleed can result in white edges.
- Misaligned Die Cuts: Incorrectly placed die cuts can cut off parts of the design.
- Inadequate Safe Zone: Not keeping critical elements away from the edge can lead to important information being cut off.
Why Bleeds Are Crucial in Die Cutting
Bleeds are crucial in die cutting because they ensure that the entire design covers the label, even if there is a slight shift during the cutting process. This results in a clean, professional look without unwanted white edges.
Practical Tips for Ensuring Proper Bleeds in Your Designs
Checking Your Work Before Printing
Before sending your design to print, always double-check the bleed areas. Make sure that:
All background colors and images extend into the bleed area.
No important text or elements are within the bleed area.
Communicating with Your Printer
Clear communication with your printer is essential. Discuss their specific bleed requirements and ensure your design meets those specifications. It’s also helpful to ask for a proof before the final print run to catch any potential issues.
Using Templates and Pre-Designed Guides
Many printers provide templates with pre-set bleed, trim, and safe zones. Using these templates can simplify the design process and ensure that your labels meet the necessary specifications.
Conclusion
Understanding and properly implementing label bleeds are essential for creating professional-looking custom printed labels. By following the best practices outlined in this guide, you can avoid common issues like white edges and misaligned cuts.
Proper bleeds ensure that your labels look polished and high-quality, which is crucial for making a great impression on your customers.
For high-quality custom labels that meet your specific needs, visit Wizard Labels. Our expert printing services and wide range of options ensure that you get the perfect labels every time. Let us help you create stunning labels that stand out.
FAQs
What is the standard bleed size for labels?
The standard bleed size for labels is typically 1/8 inch (0.125 inches or 3.175 mm). However, it’s always best to check with your printer, as some may require a larger bleed area, such as 1/4 inch (0.25 inches or 6.35 mm).
How do I set up bleeds in my design software?
Most professional design software allows you to set up bleeds during the document setup stage. For instance, in Adobe Illustrator, you can enter the bleed values when creating a new document.
In Adobe InDesign, you can adjust the bleed settings in the new document dialog box or the document setup menu.
Can I adjust the bleed size after the design is complete?
While it’s best to set up your bleeds at the beginning of your design process, you can adjust them afterward if necessary. This may involve resizing your document and ensuring all background elements extend into the new bleed area.
What happens if I don't include bleeds in my label design?
If you don’t include bleeds in your label design, you risk having white edges around your labels where the paper or material shows through. This can look unprofessional and may result in your labels being rejected by the printer.
Are there any tools to help ensure my bleeds are correct?
Yes, there are several tools available to help ensure your bleeds are correct. Design software like Adobe Illustrator and InDesign have built-in bleed settings. Additionally, many printers provide templates and guidelines to help you set up your bleeds correctly.
