Frequently Asked Questions

Artwork

Can You Help Me With My Custom Product Label Design?

Yes! Please visit our Design Services page to learn more information and request a quote! We offer design services for both updating existing label designs, as well as creating new custom labels.

A label is a vital aspect to your products success or failure. It is what captures a customer’s attention and helps to guide decision making in the buying process. Our professional graphic design team here at Wizard Labels can help make your label dreams a reality! Whether you need to refresh your current label design, or start a design from the beginning stages, our team can help.

How does CMYK vs. RGB color mode impact my product label designs?

Which color mode should my graphic designer use when designing my product labels? That’s easy – the answer is CMYK!

Our digital presses print in “Four Color Process” mode – often called CMYK because it represents the four primary colors (Cyan, Magenta, Yellow, and Black – the “K” stands for “key,” which means black in printers-speak). These four colors are then mixed in various combinations to give you an unlimited variety of color choices. Our Four Color Process printing is fundamentally similar to how your desktop printer works too – although our industrial presses are probably a little more expensive (like, how does $1Million-plus per press sound?).

In contrast, RGB (Red, Green, and Blue) is a three-color combination used by computer monitors and TV screens. Since our digital presses use CMYK mode, printing a product label that’s designed in RGB mode can result in significant color distortion. It’s therefore critical that your designer create your artwork files in CMYK mode to maintain accurate colors for your product label.

Free tip – if your designer doesn’t know the difference between CMYK vs. RGB color mode, or wants to argue about the correct one to use, we politely suggest you might wish to reconsider that relationship. If your carpenter doesn’t know the difference between a hammer and a nail, the same advice applies. No charge – you’re very welcome.

Bonus free tip (we’re feeling generous today) – NEVER look at a computer monitor and assume the color will look the same when printed. Tweaking a design on-screen to achieve a pleasing color result is a recipe for disaster when you print the same design. ALWAYS test-print the design on your own desktop printer as a starting point, which if nothing else will demonstrate the differences between an RGB monitor and a CMYK printer. Then throw that printout way – because you can also assume that almost every desktop printer will produce a slightly different result (even identical models). We’re not trying to frighten you here (wizards are not monsters), but trying to help you understand that what your designer shows you on their computer is NOT a good representation of the printed result. Again, hammers and nails.

What does "Bleed" mean in a custom product label design?

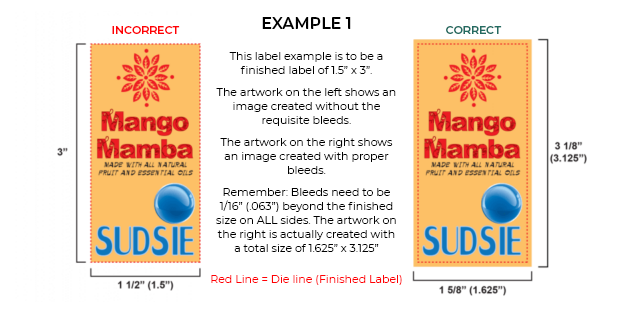
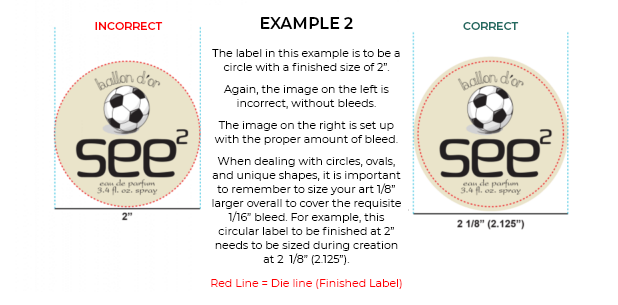
A bleed is the extension of a background color/pattern beyond the edge of the product label. This ensures that the design isn’t inadvertently cut off during the die-cutting process.

We require 1/16″ (0.063″) of bleed on ALL sides of your product label. When dealing with circles, ovals, and unique shapes, it is important to size your art 1/8″ larger overall to cover the requisite 1/16″ bleed at each side. Click the image below for a larger view.

What do you mean by "Clear Space" on my custom product label design?

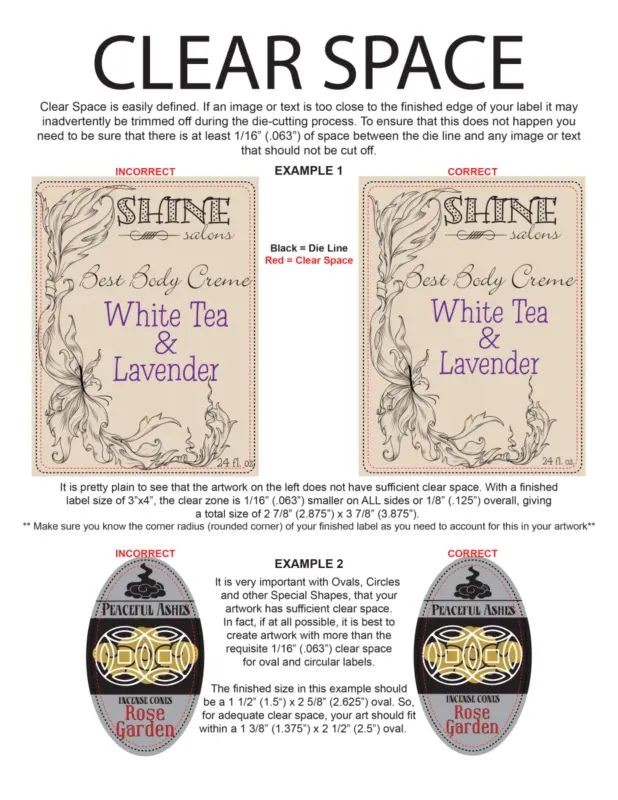
If an image or text is too close to the finished edge of your custom label, it may inadvertently be trimmed off during the die-cutting process. To avoid this, you need to keep at least 1/16″ (.063″) of space between the die line and any image or text. This clear space is what we in the printing industry call, “clear space.” Click the image below for a larger view.

How do I indicate where to print white ink on my product label?

It’s not uncommon for customers to want White ink to be printed in parts of their labels – most particularly if they’re using Chrome or Clear material. If you do wish to make use of White ink in this way, there are a couple of ways to achieve it during the design process, depending on which software the designer is using:

As explained elsewhere, our preferred file format is Adobe Illustrator – which is a vector-based program that produces the best printed results. If your designer is using Illustrator, the process of adding White ink is relatively simple. The designer just needs to lay out the White ink on a separate layer with a custom spot color – and name the layer “white ink”. It also helps if they make the “white” swatch 100% Cyan and 100% Yellow (100/0/100/0) so that the white ink areas appear bright green in the artwork and very obvious to our pre-press technicians. We will then use that layer to tell the press where to print white ink.

FYI, it’s also possible to add a white layer in Photoshop – but slightly more complicated. That said, a competent designer should know how to do this.

Alternatively, if your designer is using software that doesn’t support layers and/or is producing “image files” (e.g. jpg, png, or any other raster files with minimal ability for us to manipulate them) they should lay out the chosen “white areas” in a separate file and assign Black as the color (so it’s visible on the screen). We will assume that any areas showing as black in that file should be superimposed in the original design and set to print White.

Also assume that anywhere there is no color defined in the artwork, no ink will be printed and the background will show through – in the case of Clear material this will be the product itself, but on Chrome it will be the shiny silver metallic material.

Why does Wizard Labels not accept InDesign files?

We occasionally encounter customers who have designed their labels using Adobe InDesign, and they express surprise and/or indignation when we refuse to accept those files in their native format (i.e. files with an *.indd extension). In order to explain why, let’s first take a look at the history and intent behind InDesign.

Adobe developed InDesign as the successor to Aldus PageMaker – which they acquired in 1994. PageMaker was a significant player in what was then called “desktop publishing”, and InDesign was developed to take its place in the Adobe suite of products. Keep in mind that the internet was still many years away from being the pervasive platform we now take for granted, so desktop publishing was all about creating printed items such as brochures, newsletters, magazines and so on – essentially anything using “pages” as the common delivery mechanism.

Accordingly, InDesign was specifically engineered with that kind of goal in mind – it provides amazing control over page layouts and “book-style” multi-page publications. But at its core, its strengths are in what used to be called “typesetting”, i.e. laying out lots of textual content in a user-friendly way to aid readability and continuity – using paragraphs, columns, page numbering etc – and it makes excellent use of templates to standardize layout throughout a publication.

So why not use it for designing product labels? Well, there are a number of reasons – not all of which are exclusive in themselves – but the finished package has some definite downsides:

Indesign files are not actually a single file at all – they’re a structured collection of various elements in a folder-style arrangement, with fonts, images, text etc all having their own special structures. This means that the .indd file is completely unusable by any other software (even Adobe’s other products!).

This means that if we were to receive an InDesign file, we would first have to open it in InDesign, then export the design into a format our printing presses can work with – and that format is (wait for it…) Adobe Illustrator. Yes, it’s true that we can work with many other formats too, but they all need to be prepared for press in Illustrator before we can actually print them.

In the case of InDesign, even though it’s also an Adobe product, the two formats are quite incompatible – and unexpected results can occur when exporting into Illustrator format. Our pre-press staff would probably not even recognize any issues that might occur during the transfer, because they didn’t design the labels and have no way to know what the designer was intending. Hence it makes perfect sense for the original designer to do the exporting process – and thereby ensuring that the output is what they expected and intended.

In summary, there are way too many possible (and unintended) consequences of us having to mess with InDesign files, and we simply see no practical benefit in taking that risk – especially when it’s not difficult for the original designer to take responsibility for delivering something that we can have more control over and is less likely to produce unexpected results when you receive the finished labels.
Basics

What is hot stamp & embossing?

What is hot foil stamping?

With hot stamping, metallic foil is directly stamped into the labels. The heat provides a distinctive sheen and opens up new creative design possibilities for your brand. Plus, we offer an extensive library of foils to choose from to create your new hot stamp design!


What is embossing?

Embossing is a printing process that provides a unique tactile experience on your product labels. Embossed labels can emphasize an image or line of text, giving special importance to that part of your label design by raising it above the surface. Any type of imagery or text can be embossed so your options are limitless!


Learn more & get a free quote today: https://hotstamp.wizardlabels.com/

How do I get started with custom product labels?

For folks new to the product labeling game (or those looking for a little more insight into the approach and process), we’ve created an introductory document called “Product Labeling Fundamentals” just for you – which explores many of the most common areas of concern and/or confusion.  Hopefully it may also save you some pain and/or expense, so feel free to download and absorb it at your leisure. The document is available for free download from our home page (left hand side) – just enter a valid email address and it will be magically sent to your in-box within seconds.

What size and shape should my product labels be?

We get asked this a lot – which is unfortunate because there’s no real answer. Product label size and shape depends on the type of product you’re packaging, what regulations need to be taken into account, how much information you wish to include, what images you want to display on the product label, and so on. Products on the supermarket shelf using the exact same containers often have very different label shape and sizes, so it’s important to understand that there’s no such thing as a “standard size”.

Arriving at the correct product label size and shape is a critical part of the product label design process, and that’s not something Wizard Labels gets involved in. Our contribution is to print high-quality custom product labels from customer-supplied artwork. The optimal label shape and size of your custom product label is impossible for us to predict – although we do like to give general tips and design insights through our blog.

I need a custom-shaped label - Can you help me?

Absolutely! Unlike most label printers, we have a high-tech laser machine that can cut almost any shape on almost any material (with a couple of minor exceptions).

Most label printers without laser-cutting equipment need to have custom dies made to cut special shapes  – which can cost you several hundreds of dollars and involve extra delays while waiting for a die to be made. With laser cutting, there are no die charges, but we do charge a nominal fee (usually $30) to prepare a special file that drives the laser beams to achieve the desired result.

Because our online Quoter has no way to predict the level of complexity involved with a special shape, we’ll need to see your artwork before knowing which fee to apply. So you should just choose the “Special” shape when quoting and ordering. Once we see the artwork, we’ll let you know whether the Laser Fee will be $30 – and assuming you approve the charge we’ll just add it to your order and proceed as normal.

SPECIAL NOTE: in order for our laser equipment to correctly cut your custom shape, your artwork files need to include a vector die-line showing precisely where the laser beam is required to cut the shape. Your graphic designer should know how to create a vector die-line, without which we can’t produce the required result.

Can I get free product label samples?

Absolutely! Complete our sample request form here and we’ll mail you a free selection of printed product label samples. Our free label samples demonstrate how different combinations of material and finish look in real life while showing off the superb color and photo-quality of our digital label printing presses.

Note – sample packs are sent via US Mail standard delivery, and are only available to recipients in the United States and Canada. If you don’t fit that description but would still like to work with us, please contact us and we can explore options.

What is Wizard Labels' standard turnaround time?

We get this question a lot – which is surprising because we’re among the fastest in the label-printing industry. Our normal production time (for 95% of orders) is 2 working days from the time we receive your approval of the proofs (plus delivery time of course). This is much faster than industry norms (which can often be weeks rather than days), but many people don’t understand why it takes even that long. Let’s explore the various steps in the process…

First, you place your order and supply us with the appropriate artwork (assuming of course that it’s not a simple repeat order, in which case we already have the artwork). Whenever we receive new art files, our pre-press department then has to “pre-flight” every file you’ve sent. This process is necessary to produce proofs for your approval, and also get the files into a press-ready state. The amount of time taken to complete this process varies a lot (depending on how good the art is when we receive it), but we allow on average 5 minutes per file. Hence, a 20-version order (i.e. 20 different files) might take 100 minutes of pre-press time just to get them ready to print.

Proofing. Regardless of whether you’ve sent new files or are re-ordering artwork we’ve used previously, we still need to “proof” the order (i.e. we send you a PDF with all the versions you specified) – this is necessary to make sure we pulled the correct versions and we also got all the quantities etc correct. While this may seem unnecessary, it’s our only way to ensure we correctly interpreted your needs – and we often get customers realizing they accidentally ordered the wrong things – so proofing is an essential step.

Once the proofs have been sent to you, we obviously have no control over how long it takes you to check and approve them (or advise us of any corrections). That can often be very quick, or some customers can take days (or even longer) to do their part in the proofing process. That’s why we NEVER schedule a production job until we get the final approval to proceed. So, here we are – 4 steps into the process of delivering your labels, and we still haven’t even got into the actual production part. It’s our goal to get through the proofing process well within one workday, but we usually beat that goal unless there are problems with your artwork or some other unexpected issues occur.

Okay – so now we have an approved job to produce physical labels. This is when the real fun starts, beginning with scheduling the job. We normally allow a couple of workdays to complete the job and ship it out to you, and here’s why we need that long…

Printing. Our digital printing presses are very sophisticated electronic beasts, costing around a million dollars apiece (and we currently have six of them, with more being added as we continue to grow). Each unique “job” requires a variable degree of setup time before the first label gets printed – depending on what material you’ve chosen and whether a changeover is needed. Obviously we try to schedule like jobs together to streamline the setup process, but changing materials can take 20-30 minutes to complete, and that normally gets done several times each day. Once the appropriate material is mounted and the press calibrated for that material, the operator can normally hit the “Go” button and the magic starts – your labels begin being printed onto the substrate (that’s a fancy term for the label material).

Depending on how many labels you ordered, this initial printing pass can take anywhere from a few minutes to quite a few hours – with the average job taking maybe 10-15 minutes of actual print time. The output from this printing pass is a roll of material (called the “web”, which is 13” wide) with your labels printed side-by-side across the width of the web. For example, if your label is 2” wide, we can print 5 of them across the web, whereas a 5” wide label can only be printed 2-across. Regardless, we end up with a printed web with your labels arranged in their beautiful glory in the most efficient way possible (to keep costs and waste down).

Die-Cutting/Laminating. The printed web is just the beginning – the roll is then dismounted from the printing press and passed across to the next department in the process, which is die-cutting and laminating (where a thin film of clear protective lamination is normally applied on top of the printed material). This all occurs on a completely separate piece of mechanical equipment (about 20 feet long). The die-press operator has to mount the correct cutting die to “punch” out your labels in the proper size and shape, removing the waste between the labels in the process. Mounting a die and adjusting the die-press for each new job usually takes 10-15 minutes and then the operator hits “Go” and the magic continues – the web streams through the die-press and out the other end comes a die-cut web with appropriate lamination in place and all the waste removed. This web is then passed on to the next department…

Slit/Rewind. In the Rewind section, yet more equipment lies in wait for the die-cut web (which still has a number of labels printed across it). The rewind operator mounts the web on the slitter-rewinder, and adjusts rotary knives to slit the web into individual rolls of labels – and the machine also mechanically counts the labels as required. The rewind operator is also responsible for making sure the rolls end up in the correct “unwind direction” for your intended application method – the output from this department is a collection of finished rolls of labels. These rolls then get conveyed to the Packing/Shipping department.

Packing/Shipping. This area is the last step in getting your order out the door. The finished rolls arrive in their hands and the packers assemble the order into boxes suitable for shipment. They also print and insert a Packing Slip to indicate what they’ve packed, then the UPS shipping label gets printed and applied to the box(es). Late in the afternoon, a UPS truck comes in and collects all the orders for that day and takes them off for delivery per your instructions.

Delivery. This is when the rubber really hits the road. Our free 2-day delivery to anywhere in the US is unique to the best of our knowledge, and depending on your location it may actually happen overnight at no extra cost. However, obviously we have no control over your shipment once it leaves the plant – we rely on UPS to deliver it to your nominated location in the most efficient way possible, but things can sometimes go wrong. Adverse weather, mechanical breakdowns or other unexpected issues can affect that process too. Delays in delivery are surprisingly rare in our experience, but it’s important to understand they can happen – in which case we will need to work with you to arrive at the most efficient solution possible.

​As you can hopefully see from the above, there are many individual steps involved in producing each and every label order. In short – Proofing, Printing, Die-Cutting/Laminating, Slit/Rewind, Packing and Shipping, and lastly the Delivery itself.  Each of these steps are necessarily time-consuming to achieve the best possible quality, and a single job typically takes a couple of workdays to wend its way right through the plant and onto the UPS truck.

Given that the plant ships between 50 and 100 individual orders per day (involving many hundreds of unique versions of artwork), hopefully you can begin to appreciate why it’s not simply a matter of pressing a single button and everything happens without significant manual and mechanical involvement. We believe that our stated goal of 2 working days in production is extremely competitive and efficient – while we constantly look for ways to improve it even further.

It’s also important to note that our entire business is focused on “custom labels”, and that implies we make everything to order from scratch. We do not carry inventories of off-the-shelf items, because every customer has unique needs for their products.

If we could offer a single critical piece of advice to our customers, it would be this…

While most orders should arrive in your hands within a working week of you placing the order, it makes sense to allow for exceptions in advance. Don’t leave your orders until the last possible minute and then expect everything to go according to plan. Murphy’s law is invariably most likely to strike when there’s no wiggle-room to play with, so building in some extra time will certainly help to minimize stress levels for all parties.

Lastly, at Wizard Labels we do not offer a “rush order” facility. We consider every customer (and every order) to be equally worthy of our best efforts, and we consider rush charges to be an abomination. We certainly recognize that some label printers charge such fees, but we feel that approach is nothing more than a sneaky profit-spinner with adverse affects on the loyal customers with orders already in the queue.

Also keep in mind that our normal 2-day production times largely remove the need for rush charges anyway. In many cases we can upgrade the shipping to Overnight, but our finely-tuned production process is not something we feel is worth tinkering with and upsetting the entire apple-cart.

What's the difference between product labels and stickers?

Many people use these terms interchangeably, but we believe there’s a subtle difference between labels and stickers. They certainly have very similar characteristics (i.e. they’re often printed on the same materials and they both stick to things). However, our simplistic way to differentiate between the two terms is “Labels SELL something while stickers SAY something”. Labels are usually product-related, while stickers usually make statements like, “Great Job!” or “Vote for Joe Smith.”

Oh, and there’s one other difference between labels and stickers that you should consider. Labels for products are usually produced on rolls (for machine application to product containers), whereas stickers often come on sheets. If your need is for stickers on sheets, we can’t help you – sorry! … but if you’re fine with rolled stickers then contact us – we may be able to make what you need.

Do you sell machines that apply product labels?

No we don’t. But there are many specialist suppliers of product label application machines ranging from very cheap to very expensive. If you’re looking for an entry-level machine for applying labels to your products, there are a couple of well-regarded companies that our customers have reported good experiences with.

For semi-automatic labeler machines, check out zaplabeler.com or easylabeler.com. Both are family-owned businesses with excellent customer service and reasonably-priced products for semi-automatic label application.

Please keep in mind if you are researching label application equipment that all our labels are produced on 3″ diameter cores, so make sure the equipment is built to handle 3″ cores (which both of the above products do). It’s also important to consider whether the equipment can accommodate rolls up to 8″ in diameter – which is our standard maximum roll size unless otherwise requested. When using applicator equipment, it’s usually more efficient to minimize the number of rolls you need to mount and get set up (often known as “changeover time”).

Business Terms

What are Wizard Labels invoice terms?

That’s easy – we don’t have any. Our business model is 100% e-commerce – all label orders are placed through the online store and need a valid credit card to proceed. By operating this way, we’re able to keep our costs (and therefore prices) as low as possible.

NOTE: Your card will not be charged until proof approval; however, it will be pre-authorized at checkout for your order total. Your card will then be charged at proof approval for the final order amount. We do this simply to verify your credit card is valid and has sufficient funds to cover the pending transaction.

How much does it cost for extra colors on my product labels?

Nothing! Unlike traditional printing presses which use printing plates for each color, our digital presses don’t use plates at all – so there’s no additional costs for extra colors. Your designer can have true freedom when designing your custom product labels without having to worry about cost impacts.

Digital Label Printing

What are the Advantages of Digital Label Printing?

The vast majority of product labels you see on store shelves are still printed on the traditional mechanical presses that have been around for generations. The process is most often called “flexography” – or flexo for short – and it relies on flexible “printing plates” (one for each color) to apply the ink to the material. The inks themselves are kept in separate “stations” with each color being applied sequentially as the material moves through the press (which can result in “registration” issues if the successive colors don’t align perfectly).

It’s fair to recognize that this technology produces a fine product in many circumstances, but there are challenges associated with the approach. The plates themselves can be quite expensive (more colors means more plates), and any changes to the design or content will require new plates to be made at additional cost. Flexo presses also require significant setup time (often several hours) and substantial material wastage before the first production label can be printed – and these additional overheads often force customers to buy higher quantities to bring the unit cost down to an acceptable level. In some cases, particularly for high volumes, this is not a major concern … but if you end up buying 50,000 labels when you only really need 500 or 1,000 for your first batch of product, then it’s obvious that the financial model is being compromised by the technology.

Conversely, digital label printing presses do not use plates, and they also require much less setup time and waste – in many cases none at all. In simple terms, they operate more like a desktop laser printer (although very much bigger and way more expensive) – the artwork files are sent directly to the press and the various colors are printed simultaneously. No plates, no special ink stations, minimal waste and setup – all this translates into a much more flexible scenario for you the customer. In practical terms, the press operator can print as many (or as few) labels as you need at a time, and if you need to change the design or content then it’s just a matter of changing the artwork and re-sending it to the press.

Benefits of Digital Printing

  • Speed of Service. Traditional label companies can take anywhere from a week to many weeks to produce a label job, whereas digital companies can typically turn a job much more quickly. At Wizard Labels, our normal production time is 2 working days from the time we receive your approval to proceed.
  • Quality. Constant improvements in the digital process have resulted in photo-like quality with unlimited colors, whereas traditional presses mostly rely on a single-plate-per-color model, adding extra cost for each additional color. Most customers are very pleasantly surprised when they see the beautiful results achievable from a digital press, and the absence of plates makes changes to the design a very simple and inexpensive option.
  • Cost and Cash Flow. Depending on the quantity of labels printed, it’s certainly possible that the traditional flexo approach can produce a lower unit cost per label – but shorter runs are almost always cheaper if produced digitally. Also, it’s important to consider the overall cost of the traditional job – you could easily end up buying many more labels than you need immediately (affecting cash flow) or alternatively have to consign masses of unused labels to a landfill if something about your product changes. And we all know that regulatory requirements can change with minimal notice – thereby making your existing label stocks worthless.
  • Flexible Quantities. With digital technology, it’s as simple as telling the press how many labels are needed (similar in concept to telling your desktop printer you want 15 copies or 150 copies). If you need more in a month, we just repeat the process and tell the press how many you want this time. Given that the press needs minimal setup each time, you can print anywhere from very low quantities to very large quantities – there’s no need to predict your needs months in advance.
  • Versioning. This is a term that refers to the ability of digital label presses to print “similar but not identical” label designs simultaneously – something that’s impractical in traditional presses due to the underlying reliance on “plates”. On a digital press, we can print numerous variations of the same size at the same time – so you can combine multiple product needs in a single run. This approach is called “ganging” and it means you gain the benefit of cheaper prices and can even specify different quantities per version (e.g. 1000 Chocolate, 2500 Vanilla, and 1750 Raspberry), all in the same run – thereby getting a unit price based on the combined quantity of 5250 labels. And the colors and designs can be completely different too, so long as the labels are the same size and on the same material so they can be combined in the same run. Versioning also means you can be much more creative in your product offerings – the label cost should not be a consideration.
  • Inventory Costs. When you print 50,000 or 100,000 labels for a single product on a traditional press, the quantity is often driven by the desire to get the unit price down (quite understandably). But if you don’t use all those labels immediately they need to be stored somewhere – consuming valuable space and possibly warehousing costs. If you have many unique products, each of which has large stocks of labels waiting to be used, it’s easy to imagine the impact on cash flow and storage – not to mention what happens if something suddenly changes (like an ingredient or legal requirement) and they all become obsolete. Many customers are now realizing that it makes perfect sense to buy their labels on an “as needed” basis rather than having to order (and pay for) an unreasonably large quantity up front.
  • Variable Content. With digital presses, it’s actually possible to have slightly different content on EACH individual label printed. A very common example is serial numbering (where each label has a different number), but this is just the beginning. Variable content opens up a whole new world of product possibilities. If this capability is of interest to you, please consult us so we can guide you in the right direction.
  • Press Proofs. Digital printing offers the ability to print your proofs on the actual production press without all the setup associated with traditional printing presses. This is not a free service, but if you’re particularly concerned about colors or quality before you go into production, we can make press proofs available at an extra charge – and there are associated delays involved. See here for more information.
  • Prototyping. Have you ever considered trying out various label designs on your own customers, or maybe a focus group? Sure, you can hand them pretty designs on normal paper from a desktop printer, but how much more “real” would it be to show them finished products in multiple different ways? With our digital presses, you can gang as many designs as you like together, and only print a small number of each quite cheaply – something completely unachievable on traditional presses.

So, in summary it’s accurate to say that the traditional flexo presses are still quite suitable for very long runs (i.e. large quantities of each individual label), but the modern digital presses are certainly a better bet for most shorter runs – or where there are multiple versions of the same product line. If you’re currently faced with hefty up-front costs for labels and are concerned about obsolescence and waste, you owe it to yourself to explore the benefits of digital printing technology. Frankly, if your current label provider has not moved into digital label printing (and the vast majority have still not, due mainly to the expense involved), you’re probably not getting the best deal possible.

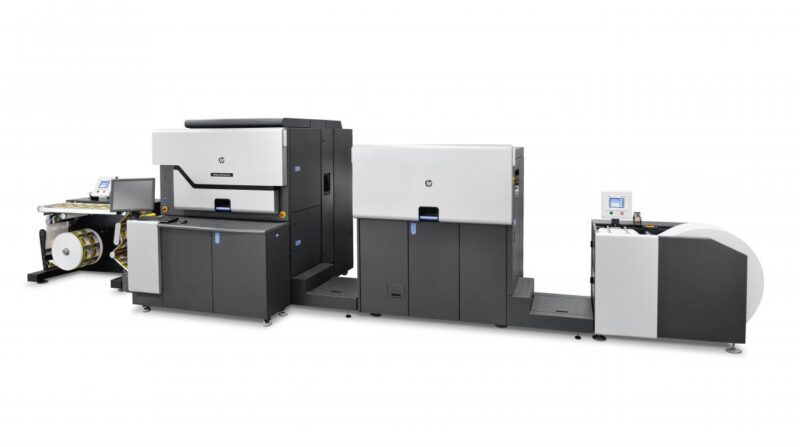
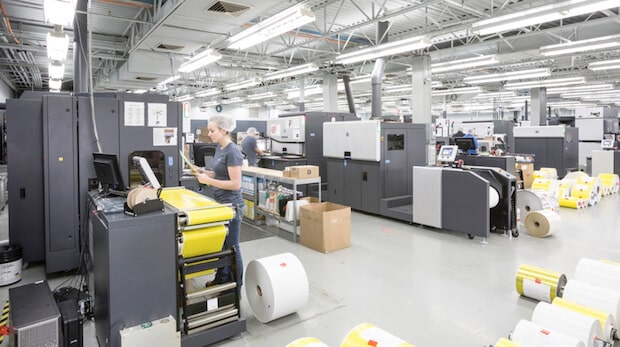
Here’s what the world’s leading Digital Press for printing labels (the HP Indigo WS6000-series) looks like:

Our commitment to this technology is based on the simple fact that it produces the best quality results available on the market – bar none.
Do you offer eco-friendly product labeling materials?

Well, it depends what you mean by eco-friendly. Paper is theoretically a “renewable” resource and it has the potential to break down in a landfill, so that makes it an eco-friendly product label – right? Well… not necessarily. When you factor in the carbon footprint of all the logging trucks and paper mills, it’s not as clear-cut as it may seem. Then, if you stick a paper-based custom label on a plastic container (or apply a plastic over-laminate to protect it, which is very common indeed), the recycling stream gets very complicated as well.

We’re also aware of some interesting materials claiming to be eco-friendly, but some of the claims are questionable upon further investigation. There are indeed label materials made from corn – and even stone! But if you consider the less obvious impacts on the environment (food chain disruption in the case of corn, and the carbon footprint associated with quarrying stone and then converting it into a usable product), as usual there are differing perspectives on the overall ecological benefit of such initiatives.

It’s also important to consider some of the other factors involved in printing product labels. When compared with traditional printing presses (which still produce the vast majority of product labels in circulation) our digital presses consume less energy, produce less waste, use less ink, and require much less industrial chemicals for cleanup. In the bigger picture, these factors can have a significant impact on the whole “eco friendly” discussion – so it’s not appropriate to focus on just the material your labels are printed on.

We’re certainly not experts in eco-management, but we tend to think the primary purpose of a product label is to help “sell” the product – and the label is a very small part of a product in the overall analysis. If you’re comfortable using plastic containers for practical reasons (even as a consumer), then applying a plastic label doesn’t seem like a major abandonment of principle – and it may even help the recycling stream in a small way too.

Can You Guarantee Color Consistency Between Orders Of My Labels?

We occasionally get questions like this from customers who have had bad experiences with other printing companies, and in reality the print industry has always faced challenges with color consistency. The older traditional analog presses use liquid inks that are often hand-mixed for each job, or kept in bottles in anticipation of a need sometime in the future. The process of ink-mixing has certainly improved over time, but it’s still somewhat reliant on human involvement and individual judgement.

The good news is that at Wizard Labels, we use only the very latest digital presses and we calibrate them very frequently (often several times a day) to ensure that any deviation in color can be minimized as much as possible. With the advent of digital printing (and more specifically “process colors”) the technology removed the need for normal pre-mixed inks and switched to automatically mixing the 4 primary colors (Cyan, Magenta, Yellow and Black) in whatever proportions are appropriate to achieve the desired color – and this is done at the time of printing without the need for any operator intervention or preparation. This process helps ensure excellent color accuracy and consistency even months apart.

Can minor color variations still occur between calibrations? Yes, it’s possible – but any such shifts should normally not be noticeable to the human eye, and frequent calibrations also reduce the amount of variation even more. So, within reason, you can expect excellent color consistency regardless of how much time elapses between your orders.

Miscellaneous

Can I Use Your Labels On Food Products?

Yes, but with limitations. Our label materials and adhesives are approved for “incidental food contact” – which means they’re fine for application to most food packaging but you shouldn’t apply them directly to the food itself.

The relevant FDA regulation is Title 21, Section 175.105 of the Code of Federal Regulations (21 CFR 175.105). Compliance with this regulation permits the use of adhesives when they are either (1) separated from the food by a functional barrier (e.g. packaging) which will prevent the migration of the adhesive components to the food; or, (2) have only incidental contact with food, limited to the trace amount at the seams or edges of the label.

So, all the techno-jargon aside, you can confidently apply our labels to your food packaging (as opposed to the food itself) – just don’t make bacon, lettuce and label sandwiches for resale!


What does "Thermal Transfer" mean on Product Labels?

As you may have noticed, we offer a Thermal Transfer finish as one of the options you can choose during a Quote or Order. What exactly does that mean?

Before diving into a detailed explanation of Thermal Transfer, we first need to understand that “Thermal Transfer” and “Direct Thermal” are two very different animals and should not be confused. Product labels are not suited to Direct Thermal treatment, so it’s important to understand the difference. Direct Thermal printers rely on special heat-sensitive paper which create an image by applying heat directly to the required areas, which blackens the paper in those areas – common examples are gas station and restaurant receipts. It’s critical to understand that no ribbons are involved in this process – which is why it’s called “direct” thermal.

Conversely, “Thermal Transfer” printers use special ribbons with colored ink that gets melted by the printhead in the chosen areas and the ink “transferred” to the material being printed on (hence the name). This technology is often used by customers wishing to “overprint” product labels with variable data (such as expiry dates, lot numbers etc). In such cases, they leave a space in the label design specifically for this purpose – we print the main part of the label with all the fancy graphics etc and the customer then adds the variable content at a later time.

Here’s where it becomes tricky. In order for the Thermal Transfer inks to adhere properly to the pre-printed labels, we need to apply a special over-laminate during the initial printing that is specifically designed to accept the thermal transfer inks from the ribbons – normal laminates do not work well for this purpose and the inks will likely smudge or rub off completely.

So, if you do intend to over-print your beautiful labels with variable data, you will need to have a suitable printer in-house AND you also need the correct ribbons to match the special over-laminate we apply during the production process. Sorry to complicate it further still, but not all thermal transfer printers (or ribbons) are created equal. For example, there are wax ribbons, wax/resin ribbons and plain resin ribbons – all designed for different purposes. In the case of the thermal transfer over-laminate we carry, resin ribbons are usually the best bet (wax is least successful and wax-resin has mixed results).

With all that in mind, unless you’ve been down this road before and know exactly what to expect, it’s absolutely critical that you test some blank samples from us (which we’re happy to provide) on your own printer with your own ribbons. Never assume the combination of all the components will produce a workable result – there are too many things that can go horribly wrong unless you test thoroughly first.

Having done all that satisfactorily, you can then proceed to order your labels with confidence – choosing the “Thermal Transfer Laminate” option in the Label Finish section of your order so we know to apply that special over-laminate. Also remember that changing ribbon types or vendors later could easily undo all your good work – in which case further testing would be prudent.

Are your labels suitable for frozen products (such as ice cream or frozen foods)?

Yes, but like many things in life…it depends.

The best advice we can offer in determining what will work for your frozen products is to test, test, test.

Our high quality BOPP labels with Permanent adhesive are an excellent choice when applied to the product container at room temperature and allowed to “set” prior to being placed in a freezer.

It is important to understand that temperature (and moisture) are likely to affect initial adhesion. The Permanent adhesive used on most of our labels performs in a service temperature range from -40F to +175F degrees and has a minimum application temperature of +25F.

However, it’s not a good idea to apply our labels to products that are already frozen (which can have ice and/or condensation on the surface that will adversely affect the adhesion) – make sure your containers are dry and clean before applying the labels, preferably allow 30 minutes for the adhesive to bond to the surface, and then freeze the product.

While there are specialty freezer-grade adhesives designed for application to already-frozen surfaces, they’re very rarely used by our customers at Wizard Labels and we don’t see enough demand to carry them.

So… order our free sample pack, cut the samples if necessary to fit your product, apply them, and see what works for your product. Again, testing is the best way to check how your labels will perform in unusual conditions.

Happy labeling!

Ordering

What is the minimum quantity of custom product labels I can order?

Due to the complexities of the advanced equipment we use at Wizard Labels, there are some practical limitations that affect the amount of waste involved in printing very small quantities. In order to minimize this waste (and the consequent effect on the environment), we require the minimum quantity for each Version within an order to be at least 100 labels. In addition, the quantity for each version must also be a multiple of 50 labels (e.g. 100, 150, 200, 250 or similar). See here for further information about version quantities.

It’s also important to understand that every job has standard overheads associated with getting the artwork prepared for the press, then printed, die-cut, rolled, checked for quality, and packaged for shipping. And many of these costs are very similar regardless of the quantity involved. The best way to find out the impact of this is to experiment with our online quoter so you can immediately see the costs for various quantities – in many cases you will find that higher quantities will cost you very little (or even nothing if the quantities are low).

On a multi-version custom label order, can I have different quantities per version?

Certainly – but within reason. For example, if your order is for a total of 2,500 custom labels for a BBQ Sauce spread across 5 different artwork versions (one for each flavor you offer), you might want 1,000 of one version, 500 each of the next two versions and 250 each for the remaining two versions (or some other logical breakdown to suit your business needs). However, in order to minimize unnecessary waste and to streamline the production process, the quantities for each version must also be in multiples of 50 labels. For example, you might order 250 of one version and 300 of another – but 275 or 325 are not acceptable quantities as they’re not evenly divisible by 50.

Why is this important? – because we print multiple versions side-by-side across the raw material, so having random quantities between versions is extremely inefficient and wasteful in every way. Does that mean all versions need to be the same quantity? Definitely not – but we may want to work with you and adjust some of them if possible. This usually only becomes necessary when we receive an order for many versions and the individual quantities are likely to create unnecessary waste (or extra time to break down in production). In such cases, we’ll reach out and see if there’s an acceptable compromise. In the end, it could save you money and at the same time minimize the environmental impact.

What does "Unwind Direction" mean when ordering product labels?

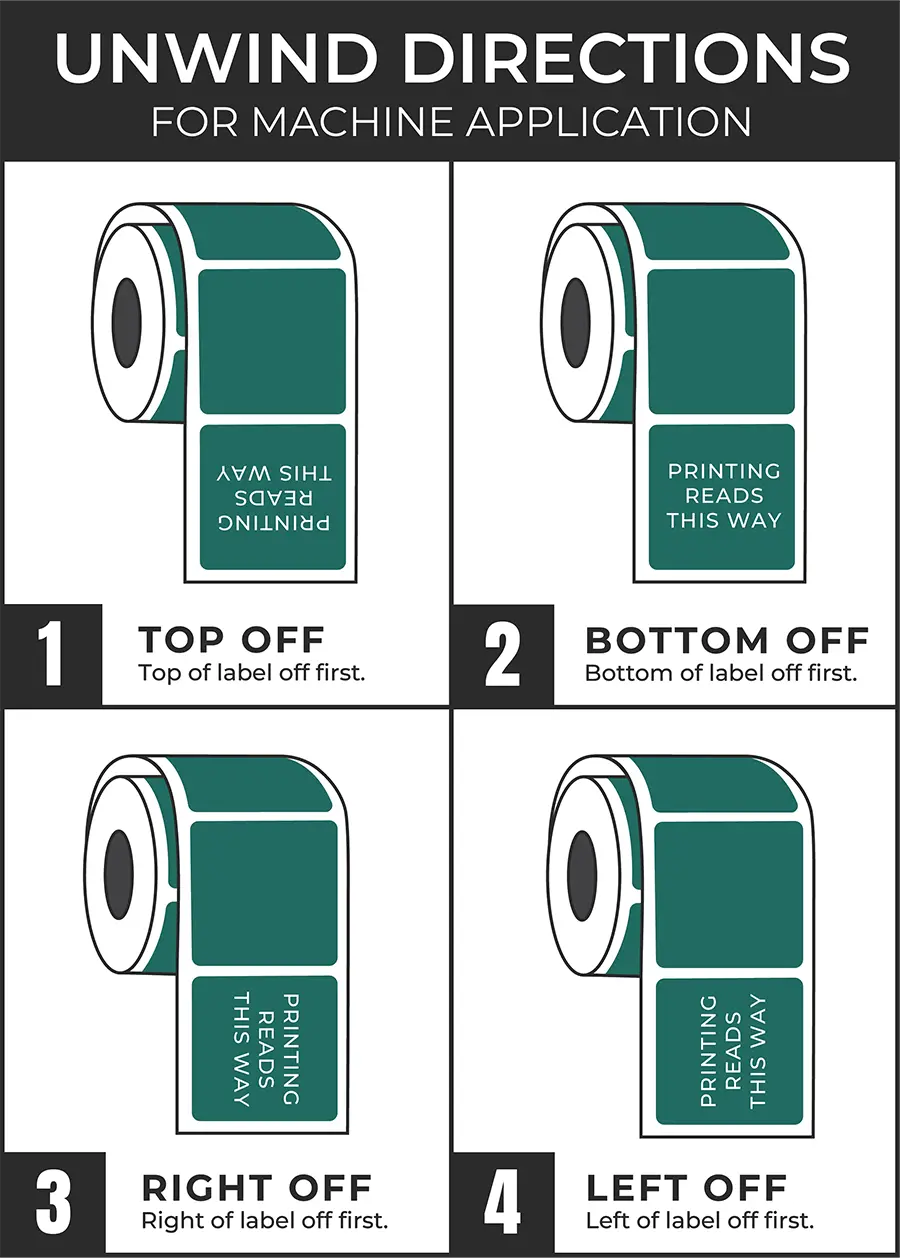
Unwind Direction (sometimes also called Wind Direction) refers to the orientation of the labels as they come off of the roll (i.e. as you unwind the roll of labels).  The label industry has developed standard descriptions for the various unwind directions to avoid any confusion.  For example, Unwind Direction #1 (Top Off First) indicates that the top of the label will be the leading edge when the roll is unwound.  Unwind directions are often not very important if the intention is to hand-apply the labels to your products, but they become critical if your labels are applied by machine – so the products and the labels are aligned correctly. Unsure how your printed labels on a roll should unwind? Contact us and we’ll be happy to help!

 
Here’s an image demonstrating the most common unwind directions:
 

Can I request a specific number of Custom Product Labels on each roll?

Well, it depends. In our experience the vast majority of such requests are made without understanding the extra work involved during production, so we try to ensure we’re doing it for the right reasons. You will need to discuss your needs with your Customer Service Rep so we can make sure we understand the underlying reasons and recommend the best approach.

Here’s an example of what we encounter on a regular basis. A customer may request “1,000 labels per roll please” – which sounds reasonable but it ignores the practical realities, as follows:

1000 labels that are 3” long will create a finished roll that is approximately 6.14” in diameter. Most label applicator machines accept rolls up to 8” in diameter (known as OD for Outside Diameter). In this case, an 8” OD roll could accommodate approximately 1,920 labels of the same 3” length – so why break the roll down if it’s not necessary?

Similarly, 1000 labels that are 6” long would fit on a 7.75” diameter roll – still well within the industry standard of 8” OD.

Conversely, if your labels are only 1.5” long, 1000 labels would only require a 4.75” diameter roll.

As you can see, the label size directly affects the diameter of the finished roll, and breaking rolls into quantities lower than can be fit on an 8” OD roll is both wasteful and time-consuming – which impacts production turn-times as well.

Also, most customers using mechanical applicators prefer their rolls as large as possible so there’s less change-over required between rolls. So it’s important that you identify the maximum OD your applicator can handle – if (like most) it accepts the standard 8” rolls, then you don’t need to even mention it to us, as our standard maximum roll size is 8” OD for any machine-applied labels.

Now, there are some exceptions to this “rule of thumb”. For example, if your applicator has a smaller maximum OD it can work with, or alternatively you may want larger rolls than the standard 8”. If that applies to you, by all means mention it to your Customer Service Rep.

Of course, all the above only applies to “machine-applied” labels. If you’ve chosen “hand-applied” in your order, then the rules change. In such cases we generally avoid splicing small rolls together, as most customers prefer 4 small rolls rather than a single large one – so they can have multiple staff applying labels to their products at the same time. However, it’s impossible to predict how many labels may end up on each roll, as each order is unique and the production layout varies according the makeup of the order.

If, having discussed your specific needs we agree that it makes sense to build rolls of a non-standard size or specific quantity, please be aware that extra charges may apply. After all, anything that requires manual intervention in the production process carries a cost overhead as well as possible delays. Our staff can explain the options more fully once they see what the order looks like.

Do you offer a "Rush Order" option to get my labels produced more quickly?

No, we do not – and here’s why… Our standard production turn-time is only 2 working days from the time you approve the proof (which is the fastest in the industry), so there’s realistically nothing to be gained by charging Rush fees. There are many complex steps involved in every production job, and we’ve finely tuned our processes to achieve that 2-day turn.

You can certainly choose to upgrade the Shipping (from our industry-leading UPS 2-day Free Shipping) – which should mean you receive your labels a day earlier – but of course we have no control over the shipment once it leaves our plant.

Also, we believe that charging Rush fees (which is sadly common in many other companies) is not very honest, because it puts other customers’ orders in jeopardy. So we work on a “first in, first out” basis to treat all customers fairly.

Special note: The best thing you can do to receive your labels as quickly as possible is to make sure the artwork you send us is free of problems and we can proceed directly to the Proofing step. If we can’t work with your files as supplied, the clock stops while you have your designer make the necessary corrections. So making sure they adhere to our Artwork Specs is the most critical factor in achieving fast turn-times.

Can I get my labels alternating down the roll?

Front/Back Alternating label orders (and Sets)

We regularly get requests from customers for different versions of their labels to alternate along the roll – e.g. front/back/front/back etc, so the labels can be applied on an automated applicator that “spins” the container past the roll and ends up with both labels applied in a single pass.

Similarly, we sometimes get requests for multiple versions to be grouped sequentially and repeated along the finished roll (e.g. A/B/C/D then A/B/C/D and so on). In both these cases, we refer to the combined groupings as “sets” – to differentiate them from the more normal approach of having each version on its own roll.

We can certainly make these special arrangements happen in production, but we need specific instructions from the customer during the ordering phase to make sure we understand what’s required. Our online ordering system is incapable of accommodating the infinite variations of sets that can occur, and the order will likely need manual adjustment once it’s received by us.

Another complication that can occur is if the individual versions are different sizes (e.g. a front label that measures 3” x 4” and a back label that measures 2” x 5” – which is not unusual in the wine industry). Placing an order for such non-standard combinations is best handled under supervision of our customer service staff – who can tell you precisely how to enter the order and get the correct price.

Conversely, if the labels are the same size then it’s much simpler.  For example, if you have 1,000 bottles of product and you want a front/back label set alternating down the roll (where both labels measure 3” x 4”), you should simply enter “2” into the Number of Versions field and “2000” into the Total Labels field – because that would result in 1,000 fronts and 1,000 backs.

However (and this is critical) – please DO NOT assume we’ll know that you need them alternating on the roll – you MUST add a note in the Optional Order Notes field on the Checkout page to that effect (e.g. “Front/Back Alternating please”) or you may end up receiving the two versions on individual rolls. Please understand that “sets” represent only a very small proportion of the orders we produce, and we’re not mind-readers. Even two versions of artwork clearly labeled “front” and “back” do not automatically indicate to us what the intention is, as the vast majority of customers usually want them on separate rolls and “alternating sets” are the exception in our experience.

Please also note that the first time you order a specific “set” of labels, we will apply a $30 ancillary charge to cover the cost of the initial setup (which is non-standard as explained) – but this is a once-off charge and will not be applied to re-orders of the same set.  When you receive your PDF proofs, you’ll notice that the set is displayed with the elements side-by-side, indicating that they’re to be printed that way.

In summary, if you’re not sure how to place your order for non-standard results, you should reach out to our Customer Service team for guidance. Once you understand the process and have had some practice it will become easier.

Finally, when you wish to re-order those same sets, you’ll find them listed as “Special” in your My Labels library on the website – but the dimensions will reflect the combined length of the versions in the set (plus any inter-label gaps between them). Again, if this isn’t completely obvious or you’re confused, just reach out and we’ll guide you in the right direction.

Proofing

What Kinds Of Proofs Do You Offer?

At Wizard Labels we offer three different kinds of label proofs, each of which has different uses depending on the circumstances:

1. PDF Proofs. All normal Production orders receive emailed PDF proofs by default (at no extra charge). We never go into production unless you’ve specifically approved the emailed proofs – this is our only way of knowing we correctly interpreted your instructions and pulled the correct artwork files for your order. Hence, it’s critical that you check the PDFs carefully – we can take no responsibility for errors that you didn’t pick up in the proofing process.
Important note: PDF proofs are for you to verify content only and should not be considered a reliable way to check colors. Computer screens display colors differently than printers do, and even different models of printer can produce variations in color.

2. Press Proofs. If you absolutely must see a physical proof of your order before we go into production, you can select that option during the ordering process (for an additional $95 fee). Press Proofs are printed on the same press(es) that your order will be, so they are the most accurate representation of what your finished labels will look like. However, Press Proofs consume time, material, and waste to produce and there are obvious delays in producing and delivering them to you. There is a limit of only one set of Press Proofs per order so we can minimize the amount of press down-time and keep production orders flowing. If for any reason you subsequently decide not to proceed with the order, we can easily cancel it and you’ll only be charged for the label proofs.

3. Concept Proofs. If you’re in the beginning stages of a label design project and need to see how various colors or layouts will look in production, we offer a facility called Concept Proofs, where your designer can test various approaches before choosing the final design. Again, there is a $95 fee for us to print an agreed selection of your artwork files (including delivery to you via UPS). Concept Proofs do not need an order to be placed first – your Customer Service representative will need to work with you to make the necessary arrangements and get the artwork files from you.

It’s important to note that both kinds of physical proofs do not have the same high priority as production orders, so there may be a delay of a day or two before they ship. We’ll do our best to squeeze them in between jobs in the least wasteful way, but production always comes first. If you have any questions about this process, please contact us and we can help advise the best approach for you.

Shipping

How much does it cost to ship my product label order?

Wizard Labels is unique in the label printing space in that all 50 U.S. states (and DC) qualify for FREE 2-Day delivery via UPS. If you’re in a super hurry, Next Day Air is available and the cost shown during the Checkout process.

For our Canadian friends, we ship everything UPS Worldwide Expedited at a nominal extra cost (calculated during Checkout).

We do not offer International shipping to anywhere other than Canada – you would need to nominate a US-based delivery address and make your own arrangements for on-forwarding if desired.

Remember to keep our free shipping in mind when comparing prices, as most custom label companies do not include shipping in their quotes.

How Will I Know My Labels Have Been Shipped?

Once your Order has been packed and a shipping label printed, three things happen that give you access to the shipment information:

1. The shipment details (destination, package size, tracking number etc) are uploaded to the UPS website. This happens automatically whenever a shipping label is generated.

2. A Shipping Notification email is also automatically generated by UPS and sent to the email address you provided when placing the order. Note that it’s not uncommon for UPS’s emails to end up in customers’ spam folders (depending on your spam settings), so please make sure that your spam/junk flters are setup to allow emails from UPS.com through.

3. Lastly (and most importantly), our website is simultaneously updated to reflect the current Status of your order (it changes from Processing to Shipped), and the UPS Tracking number is also added to your Order – so you can easily check progress via the Order History section of your account (assuming you’re logged in of course).